Content Menu
● Why Upgrade to an Aluminum Extruder?
● Tools and Materials Needed
● Step-by-Step Installation Process
>> Step 1: Prepare Your Work Area
>> Step 2: Remove the Stock Extruder
>> Step 3: Install the New Aluminum Extruder
>> Step 4: Final Adjustments
>> Step 5: Test Your Setup
● Understanding Your Ender 3 Extrusion System
● Limitations of Stock Plastic Extruders
● Benefits of Upgrading to an Aluminum Extruder
● Factors to Consider When Upgrading
● Alternative Extruder Options
● Maintaining Your Aluminum Extruder
● Community Insights and Reviews
● Troubleshooting Common Issues After Installation
● Conclusion
● FAQs
>> 1. How long does it take to install an aluminum extruder?
>> 2. Do I need any special tools for this upgrade?
>> 3. Will upgrading my extruder improve print quality?
>> 4. Can I use my old Bowden tube with a new aluminum extruder?
>> 5. What should I do if my printer still has extrusion problems after upgrading?
Upgrading your Ender 3 with an aluminum extruder can significantly enhance your 3D printing experience. The stock plastic extruder is prone to wear and tear, which can lead to under-extrusion and other printing issues. In this guide, we will walk you through the step-by-step process of installing an aluminum extruder on your Ender 3, ensuring that you have a robust and reliable setup for your 3D printing projects.

Why Upgrade to an Aluminum Extruder?
- Durability: Aluminum extruders are much more durable than their plastic counterparts, reducing the risk of breakage and wear over time.
- Better Performance: They provide better grip on the filament, leading to more consistent extrusion and improved print quality.
- Ease of Use: Aluminum extruders often come with features that make loading and unloading filament easier.
- Improved Heat Dissipation: Aluminum conducts heat more efficiently than plastic, helping to dissipate heat away from the motor and filament, thus reducing the risk of heat-related issues such as softening or clogging.
Tools and Materials Needed
Before starting the installation process, gather the following tools and materials:
Tools:
- Allen wrenches (2mm, 2.5mm, and 3mm)
- Screwdriver
- Pliers (optional)
Materials:
- Aluminum extruder kit (specific to Ender 3)
- Replacement screws (if not included in the kit)
- Cable holder (optional but recommended)
Step-by-Step Installation Process
Step 1: Prepare Your Work Area
Ensure that your work area is clean and well-lit. Disconnect your Ender 3 from the power source and remove any filament currently loaded in the extruder.
Step 2: Remove the Stock Extruder
1. Unplug the Extruder Motor: Disconnect the motor cable from the motherboard to prevent any electrical issues.
2. Remove the Bowden Coupler: Unscrew the coupling holding the PTFE tube in place. Press down on the plastic piece to release it from the tube.
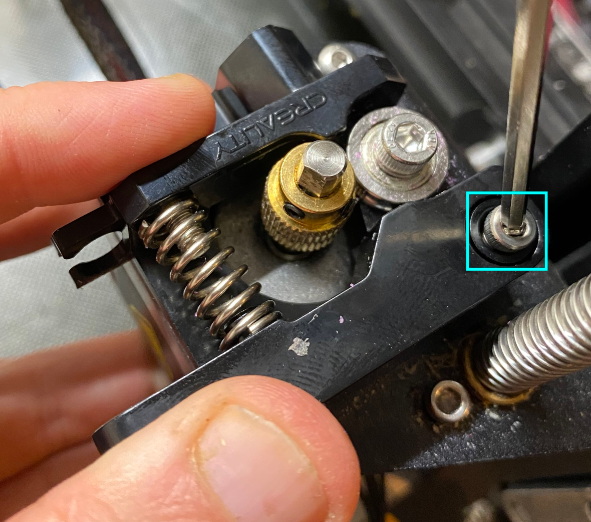
3. Unscrew the Lever Arm: Use a 2.5mm Allen wrench to remove the screw attaching the lever arm to the extruder body while applying pressure to keep it aligned.
4. Remove Remaining Screws: With a 2mm Allen wrench, remove three screws holding up the motor. Be careful not to let it fall.
5. Take Off the Stock Extruder: Gently pull away the stock extruder from its mount.
Step 3: Install the New Aluminum Extruder
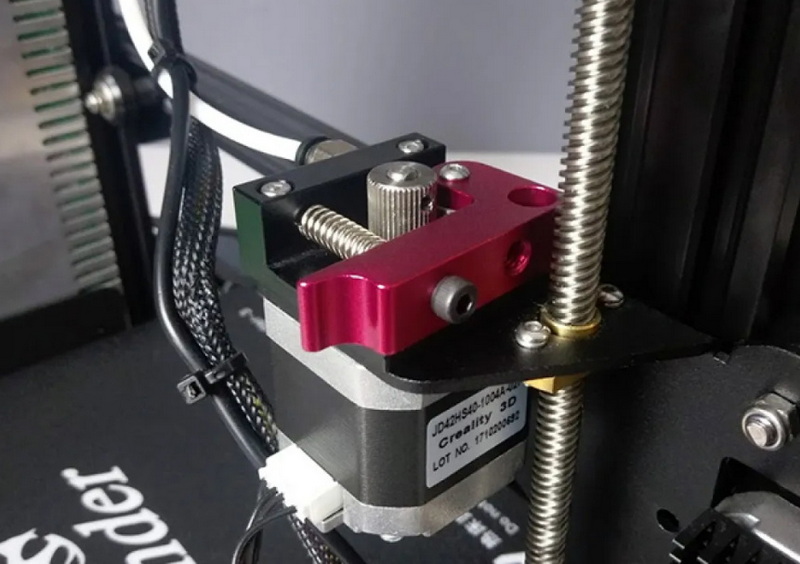
1. Attach the Stepper Motor: Position your new aluminum extruder over the stepper motor, aligning it properly with screw holes.
2. Secure with Screws: Use three screws provided in your aluminum extruder kit to secure it in place. Make sure to use a countersunk screw for one of the lower holes.
3. Install New Gear: Slide on the new gear onto the motor shaft, ensuring one of its grub screws aligns with the flat part of the motor shaft for a secure fit.
4. Attach Bowden Coupler: Screw in your new Bowden coupler into the aluminum extruder, ensuring it is tight enough to hold but not overly tight.
5. Install Lever Arm and Spring: Attach the lever arm using a thicker screw, ensuring it can move freely without obstruction from other components.
6. Reattach Spring Retaining Screw: Securely attach any springs included in your kit, which will help maintain tension on your filament.
Step 4: Final Adjustments
1. Check Alignment: Ensure that all components are aligned correctly and that there are no loose screws or parts.
2. Reconnect Motor Cable: Plug in your stepper motor cable back into its respective port on the motherboard.
3. Reattach PTFE Tube: Insert your PTFE tube back into its coupler, ensuring it is seated properly.
Step 5: Test Your Setup
1. Power on your Ender 3 and load some filament into your new aluminum extruder.
2. Run a test print to ensure everything is functioning correctly and that there are no extrusion issues.

Understanding Your Ender 3 Extrusion System
The Creality Ender 3 features a Bowden-style extrusion system where filament is fed through a PTFE tube from a remote stepper motor located at the rear of the printer frame down to the hotend assembly at the print head. This design minimizes weight at the print head but can introduce challenges such as increased friction along longer PTFE tubes or potential misalignment during movement.
Limitations of Stock Plastic Extruders
The stock plastic extruders found on many budget printers like the Ender 3 are functional but come with limitations:
- Flexibility: Plastic tends to flex under stress which can lead to inconsistent feeding.
- Wear Over Time: Repeated use can cause wear leading to slippage during extrusion.
- Heat Sensitivity: Plastic components may warp under high temperatures or prolonged exposure to heat from nearby components like hotends.
These limitations often result in under-extrusion or over-extrusion issues affecting print quality over time—issues that an aluminum upgrade aims to resolve effectively.
Benefits of Upgrading to an Aluminum Extruder
In addition to durability and performance improvements already mentioned:
- Increased Precision: The rigid structure of an aluminum extruder allows for precise control over filament feeding without flexing or slipping.
- Enhanced Filament Compatibility: Aluminum extruders are better suited for handling various filament types including flexible materials like TPU due to their ability to maintain consistent pressure without deformation.
- Long-Term Cost Savings: While initially more expensive than plastic alternatives, their longevity means fewer replacements over time—offering better value for frequent users who rely heavily on their printers.
Factors to Consider When Upgrading
When considering upgrading from a plastic to an aluminum extruder:
1. Compatibility: Ensure that any chosen upgrade is compatible with specific models within Creality's lineup since slight variations exist between versions (e.g., Ender 3 vs Ender 3 V2).
2. Installation Complexity: Although generally straightforward, those unfamiliar with mechanical assembly may find it beneficial to consult video tutorials or seek assistance from experienced users.
3. Cost vs Benefit Analysis: Evaluate whether investing in an aluminum upgrade aligns with personal printing needs—especially if only occasional use is anticipated.
Alternative Extruder Options
While this article focuses primarily on aluminum upgrades:
- Direct Drive Systems: These systems position motors directly above hotends allowing more precise control—ideal for flexible filaments but adding weight at print heads.
- Dual Gear Extruders: These feature two gears working together creating greater grip on filaments—helpful when dealing with challenging materials.
Maintaining Your Aluminum Extruder
To maximize performance post-installation:
1. Regularly inspect gears for debris buildup which could impede function.
2. Periodically check tension settings ensuring they remain optimal based upon material usage patterns.
Community Insights and Reviews
Engaging with online communities dedicated specifically towards Creality printers can yield invaluable insights regarding various aftermarket parts available including user experiences detailing successes or challenges encountered during installations.
Troubleshooting Common Issues After Installation
Even after successfully installing an aluminum extruder, you may encounter some common issues:
- Under-extrusion: If you notice gaps in your prints or layers not adhering properly, check if your e-steps are calibrated correctly or if there's a clog in your nozzle.
- Over-extrusion: If prints appear too thick or have excess material oozing out, you might need to adjust your slicer settings regarding flow rate or re-calibrate e-steps.
- Filament Slipping: If you experience filament slipping during printing, ensure that there's adequate tension applied by adjusting springs or checking for blockages along your PTFE tube.
Conclusion
Installing an aluminum extruder on your Ender 3 is a straightforward process that can greatly improve your printer's performance and reliability. By following these steps carefully, you can ensure a successful upgrade that enhances your overall printing experience. The durability and efficiency of an aluminum extruder make it a worthwhile investment for both novice and experienced users alike.

FAQs
1. How long does it take to install an aluminum extruder?
The installation process typically takes about 30 minutes if you have all tools ready and follow each step carefully.
2. Do I need any special tools for this upgrade?
You will need Allen wrenches (2mm, 2.5mm, and 3mm) as well as possibly a screwdriver for securing screws.
3. Will upgrading my extruder improve print quality?
Yes, an aluminum extruder provides better grip on filament which can lead to more consistent extrusion and improved print quality.
4. Can I use my old Bowden tube with a new aluminum extruder?
Yes, you can use your existing Bowden tube as long as it is in good condition; however, consider replacing it if it's worn out.
5. What should I do if my printer still has extrusion problems after upgrading?
If extrusion issues persist after upgrading, check for clogs in your hot end or recalibrate your e-steps to ensure accurate filament feeding.


