Content Menu
● Introduction to the TH3D Aluminum Extruder
>> Key Features of the TH3D Aluminum Extruder
● Preparation for Installation
>> Preheating the Hotend
● Removing the Stock Extruder
>> Disconnecting Wires and Bowden Tube
>> Unscrewing the Stock Extruder
>> Removing Additional Components
● Installing the TH3D Aluminum Extruder
>> Mounting the Extruder Body
>> Installing the Steel Gear
>> Attaching the Lever and Spring
>> Reconnecting the Bowden Tube
>> Reconnecting Wires
● Calibration and Testing
>> Calibrating E-Steps
>> Running a Test Print
● Benefits of the TH3D Aluminum Extruder
>> Common Issues with Stock Plastic Extruders
>> How the TH3D Aluminum Extruder Addresses These Issues
● Additional Upgrades to Consider
>> Upgrading PTFE Tubing
>> Direct Drive vs. Bowden Extruders
● Troubleshooting Common Issues
>> Extruder Gear Slipping
>> Filament Jamming
● Conclusion
● FAQ
>> 1. What are the main benefits of using the TH3D Aluminum Extruder?
>> 2. How long does it take to install the TH3D Aluminum Extruder?
>> 3. Do I need special tools for the installation?
>> 4. Is calibration necessary after installing the TH3D Aluminum Extruder?
>> 5. Can the TH3D Aluminum Extruder handle flexible filaments like TPU?
● Citations:
Upgrading your Ender 3 with a TH3D Aluminum Extruder is a straightforward process that can significantly enhance your 3D printing experience. This guide will walk you through the steps to install the TH3D Aluminum Extruder, highlighting the benefits and providing visual aids to ensure a smooth installation.

Introduction to the TH3D Aluminum Extruder
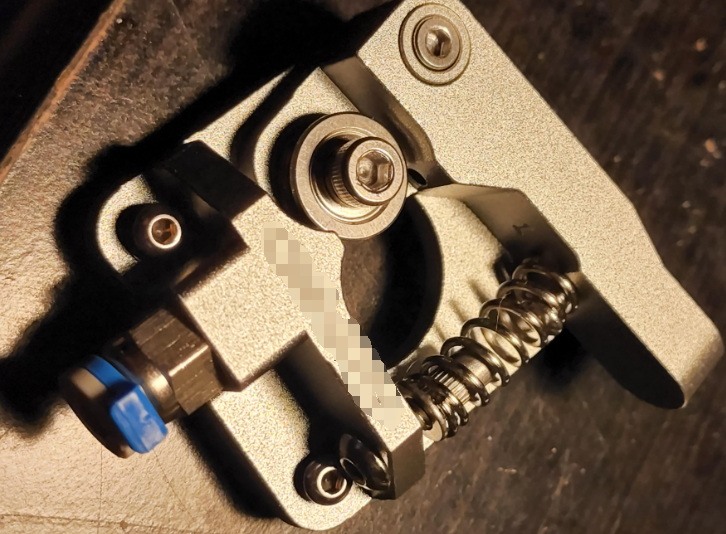
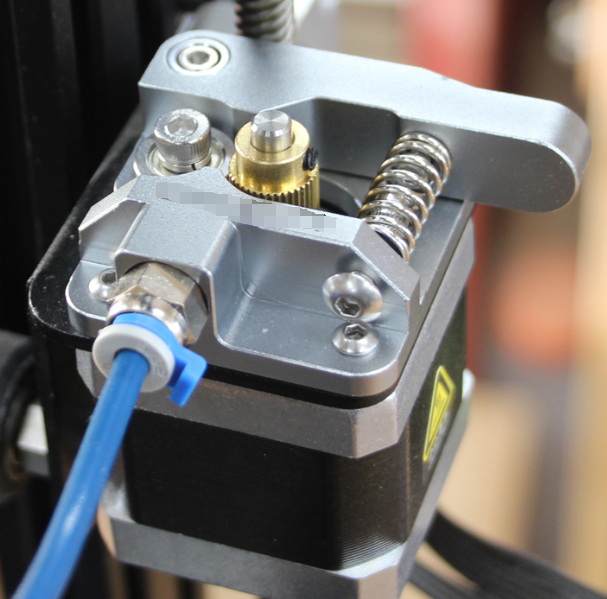
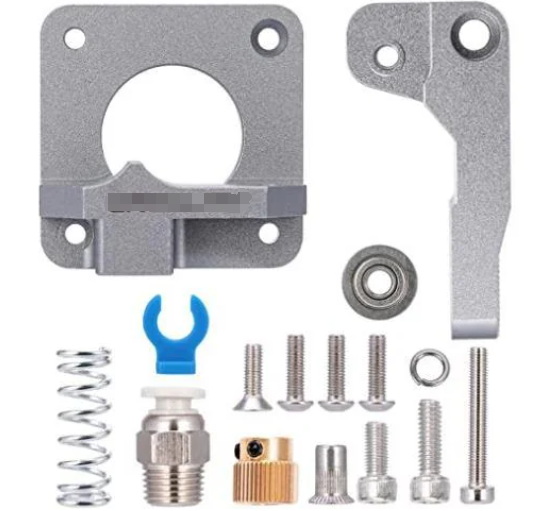
The TH3D Aluminum Extruder is designed to replace the stock plastic extruder on your Ender 3, offering improved durability and performance. It features a hardened steel feeder gear, a high tension spring for better filament grip, and compatibility with PTFE tubing for smoother filament flow. This upgrade is particularly beneficial for frequent users of the Ender 3, as it reduces mechanical failures and enhances print quality.
Key Features of the TH3D Aluminum Extruder
- Material: Aluminum for increased durability.
- Gear: Hardened steel feeder gear for better wear resistance.
- Filament Grip: High tension spring ensures consistent filament feeding.
- Compatibility: Works well with PTFE tubing.
- Support: Backed by TH3D customer support for any installation or usage issues.
Preparation for Installation
Before starting the installation, ensure you have the following tools and components ready:
- Tools: Allen wrenches (2mm, 2.5mm, 3mm), screwdrivers, and any other tools specified by the TH3D kit.
- Components: TH3D Aluminum Extruder kit, including the extruder body, steel gear, spring, and screws.
Preheating the Hotend
1. Preheat the Nozzle: Heat the hotend to around 200°C to remove any filament residue. This makes it easier to pull out the filament.
2. Remove Filament: Once heated, pull out the filament from the extruder.
Removing the Stock Extruder
Disconnecting Wires and Bowden Tube
1. Disconnect Wires: Unplug the extruder motor connector.
2. Remove Bowden Tube: Detach the Bowden tube from the extruder if applicable.
Unscrewing the Stock Extruder
1. Remove Screws: Use a 2.5mm Allen wrench to unscrew the plastic extruder lever.
2. Remove Extruder Gear: Loosen the grub screws using a 1.5mm Allen wrench to remove the extruder gear.
3. Remove Belt: Loosen the belt with a 3mm Allen wrench and unclip it.
Removing Additional Components
Cartridge Plate: Unscrew the lower roller wheel and remove the cartridge plate along with the other roller wheels.

Installing the TH3D Aluminum Extruder
Mounting the Extruder Body
1. Position the Extruder: Place the new aluminum extruder onto the stepper motor.
2. Secure the Extruder: Use the provided screws to secure the extruder body.
Installing the Steel Gear
1. Align the Gear: Ensure the grub screw faces up and aligns with the flat part of the stepper shaft.
2. Tighten the Grub Screw: Use a small Allen wrench to tighten the grub screw.
Attaching the Lever and Spring
1. Install the Lever: Attach the lever arm to the extruder using the provided screws.
2. Install the Spring: Place the spring between the lever and the extruder body. Secure it with screws.
Reconnecting the Bowden Tube
Reattach the Bowden Tube: If applicable, reattach the Bowden tube to the extruder.
Reconnecting Wires
Reconnect Motor Wires: Plug the extruder motor connector back into place.
Calibration and Testing
Calibrating E-Steps
1. Adjust E-Steps: Recalibrate your extruder steps per millimeter (e-steps) to ensure accurate extrusion rates. A good starting point is around 130 steps/mm.
2. Run Calibration G-Code: Use a custom G-code file to adjust the e-steps.
Running a Test Print
1. Load Filament: Load your preferred filament into the extruder.
2. Start a Test Print: Run a simple print to verify that everything is working correctly.
Benefits of the TH3D Aluminum Extruder
Upgrading to the TH3D Aluminum Extruder offers several benefits:
- Improved Durability: Aluminum construction resists cracking and wear better than plastic.
- Enhanced Print Quality: Consistent filament feeding reduces issues like under or over-extrusion.
- Increased Material Compatibility: Works well with a variety of filaments, including flexible materials like TPU and high-temperature plastics such as ABS and PETG.
Common Issues with Stock Plastic Extruders
Stock plastic extruders often face issues such as:
- Durability: Prone to cracking and breaking under stress or over time due to wear and tear.
- Performance: May not provide enough grip on the filament, leading to issues like under-extrusion or filament slipping.
- Compatibility: Struggles with flexible filaments or higher-temperature materials.
How the TH3D Aluminum Extruder Addresses These Issues
1. Durability: The aluminum construction is significantly more robust, withstanding higher pressures and reducing the likelihood of cracking or breaking.
2. Performance: Provides better grip on the filament, ensuring consistent extrusion and preventing issues like skipping or grinding of the filament.
3. Compatibility: Offers a wider range of filament compatibility, including flexible materials like TPU and high-temperature plastics such as ABS and PETG.
Additional Upgrades to Consider
Upgrading PTFE Tubing
For users who frequently print with high-temperature materials like ABS or PETG, upgrading to a high-quality PTFE tube is recommended. This ensures that the tube does not melt or degrade during printing, which can lead to poor print quality or unpleasant odors.
Direct Drive vs. Bowden Extruders
When deciding between a direct drive and a Bowden extruder setup, consider the following:
- Direct Drive: Offers better control over filament flow, especially beneficial for flexible filaments. However, it can add weight to the print head, potentially affecting print speed and quality.
- Bowden Extruders: Provide a lighter print head, allowing for faster print speeds. However, they may struggle with flexible filaments due to the longer distance the filament must travel.
Troubleshooting Common Issues
Extruder Gear Slipping
If you encounter issues with the extruder gear slipping, check the following:
- Tension: Ensure the tension on the extruder gear is adequate. If the gear is not gripping the filament properly, it may slip during operation.
- Gear Condition: Inspect the gear for wear or damage. A worn-out gear may not provide sufficient grip on the filament.
Filament Jamming
Filament jamming can occur due to inconsistent feeding or misalignment within the extruder assembly. To address this:
- Clean the Extruder: Regularly clean the extruder to remove any debris or dust that might obstruct filament flow.
- Adjust Alignment: Ensure all components are properly aligned to prevent misfeeding.
Conclusion
Installing the TH3D Aluminum Extruder on your Ender 3 is a simple yet impactful upgrade that can significantly enhance your printing experience. With improved durability and performance, this extruder is a must-have for frequent users of the Ender 3. Remember to calibrate your e-steps after installation to ensure optimal print quality.

FAQ
1. What are the main benefits of using the TH3D Aluminum Extruder?
The TH3D Aluminum Extruder offers improved durability, enhanced print quality, and better filament grip compared to stock plastic extruders. It also supports a wide range of materials, including flexible filaments.
2. How long does it take to install the TH3D Aluminum Extruder?
Installation typically takes less than 30 minutes, especially if you have experience with basic 3D printer upgrades.
3. Do I need special tools for the installation?
No, standard Allen wrenches and screwdrivers usually suffice. The kit comes with detailed instructions and necessary hardware.
4. Is calibration necessary after installing the TH3D Aluminum Extruder?
Yes, recalibrating your e-steps is crucial to ensure accurate extrusion rates and optimal print quality.
5. Can the TH3D Aluminum Extruder handle flexible filaments like TPU?
Yes, the TH3D Aluminum Extruder is designed to handle flexible filaments without issues commonly associated with plastic extruders.
Citations:
[1] https://www.yjing-extrusion.com/what-makes-the-th3d-aluminum-extruder-a-must-have-for-your-3d-printer.html
[2] https://chaychaytechtime.com/top-5-best-ender-3-v2-upgrades/
[3] https://forum.creality.com/t/extruder-gear-slipping-sometimes/13948
[4] https://support.th3dstudio.com/helpcenter/multimount-accessories-installation-guide/
[5] https://www.youtube.com/watch?v=ufN9lrFj6s8
[6] https://www.youtube.com/watch?v=yuLLzgEH1Hs
[7] https://www.obico.io/blog/2022/01/28/best-ender-3-upgrades/
[8] https://support.th3dstudio.com/helpcenter/using-your-all-metal-hotend/
[9] https://www.youtube.com/watch?v=RLsALMPDb84
[10] https://forum.makewithtech.com/t/3d-printing-speed-bowden-vs-direct-extruder-ender-3-v2-vs-upgraded-ender-5/3369
[11] https://www.th3dstudio.com/product-category/hotends-extruders-tubing-fittings/extruders/
[12] https://www.youtube.com/playlist?list=PLtlnjujF05-ewwTCGj0qLudi75W5dUL4Z
[13] https://www.youtube.com/watch?v=ikVFselJO4Y
[14] https://www.yjing-extrusion.com/can-you-use-an-aluminum-extruder-on-ender-3.html
[15] https://www.youtube.com/watch?v=krixZklx8kc
[16] https://all3dp.com/1/20-must-creality-ender-3-upgrades-mods/
[17] https://www.youtube.com/watch?v=UtemZqFJ5rY
[18] https://www.youtube.com/watch?v=m6dRh0oVzhc
[19] https://www.youtube.com/watch?v=8ICKdOXkDjI
[20] https://www.youtube.com/watch?v=73BBHw8Kpwk


