Content Menu
● Understanding the Stock Extruder
● Why Upgrade to Aluminum?
>> Benefits of the Upgraded Aluminum Extruder V2
● Key Features to Look For
● Installation Process
● Filament Compatibility
● Direct Drive vs. Bowden
● Calibrating Your Extruder
● Real-World Examples and Case Studies
● Cost Analysis
● Potential Drawbacks
● Conclusion
● FAQ
>> 1. What are the main benefits of upgrading to an aluminum extruder?
>> 2. Is the upgraded aluminum extruder V2 compatible with all 3D printers?
>> 3. Do I need to calibrate my extruder after upgrading?
>> 4. Can the upgraded aluminum extruder handle flexible filaments like TPU?
>> 5. Is it difficult to install the upgraded aluminum extruder?
● Citations:
For 3D printing enthusiasts, the quest for "better print quality" is never-ending. One upgrade frequently discussed in the community is the "upgraded aluminum extruder V2 with steel feeder gear". But is it truly worth the investment? This comprehensive guide delves into the benefits, installation, and overall impact of this upgrade on your 3D printing experience.

Understanding the Stock Extruder
Before diving into the advantages of an upgraded extruder, it's essential to understand the role and limitations of the stock extruder that comes with popular 3D printers like the Ender 3 V2. Typically, these stock extruders are made of plastic[4].
Plastic extruders, while functional, have several drawbacks:
- Wear and Tear: Plastic components are prone to wear and tear, especially when used with abrasive filaments[1].
- Flexibility: The flexibility of plastic can lead to inconsistent filament feeding, affecting print quality[4].
- Durability: Plastic extruders are more likely to crack or break over time, requiring frequent replacements[2].
Why Upgrade to Aluminum?
The upgraded aluminum extruder V2 with steel feeder gear addresses many of these issues. Aluminum offers increased durability and rigidity compared to plastic[7]. The *steel feeder gear* further enhances the extruder's ability to grip and push filament consistently.
Benefits of the Upgraded Aluminum Extruder V2
- Enhanced Durability: Aluminum is far more resistant to wear and tear than plastic, extending the lifespan of the extruder[1][7].
- Consistent Filament Feeding: The rigidity of aluminum ensures more consistent filament feeding, reducing the risk of slipping or jams[2][8].
- Improved Print Quality: Consistent filament feeding translates to better print quality, with fewer inconsistencies and defects[1].
- Higher Temperature Resistance: Metal extruders can handle higher temperatures, allowing for a wider range of filament types[7].
- Better Grip: The dual gear mechanism ensures a reliable and consistent filament feed, preventing slipping and filament jams[2][8].
Key Features to Look For
When selecting an upgraded aluminum extruder V2 with steel feeder gear, consider the following features:
- Dual Gear System: Extruders with dual gears provide better grip on the filament, minimizing slippage[2].
- Adjustable Tension: An adjustable tension mechanism allows you to fine-tune the pressure on the filament for optimal feeding.
- Compatibility: Ensure the extruder is compatible with your 3D printer model[8].
- Easy Installation: Opt for a kit that includes all necessary hardware and clear instructions for easy installation[5].
- Direct Drive Conversion: Some kits offer the option to convert to a direct drive system, which can further improve print quality with flexible filaments[2].
Installation Process
Installing an upgraded aluminum extruder V2 with steel feeder gear is a straightforward process that can be completed in under an hour. Here's a step-by-step guide:
1. Preparation: Turn off and unplug your 3D printer. Remove any filament from the extruder[5][6].
2. Disassembly: Detach the Bowden tube from the stock extruder. Use an Allen wrench to remove the screws securing the stock extruder to the printer[5].
3. Component Removal: Carefully support the extruder motor as you remove the final screws[5].
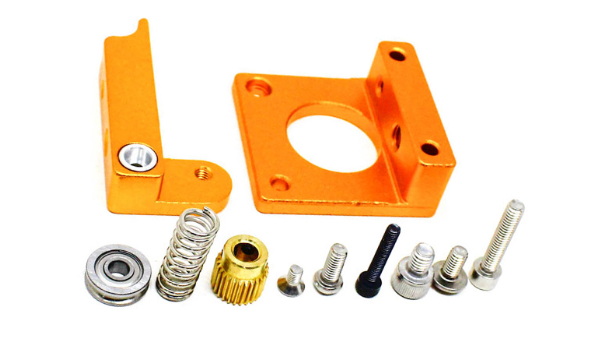
4. Gear Installation: Slide the new steel gear onto the motor shaft, aligning the grub screw with the flat side of the shaft[6][11].
5. Assembly: Attach the metal extruder housing using the provided screws. Ensure the motor cable is correctly oriented[6][11].
6. Lever Arm: Assemble the lever arm with the idler pulley and attach it to the housing, ensuring it moves freely[10][11].
7. Spring Installation: Position the spring and secure it with the retaining screw. The lever arm should spring back into place when pressed[4][6].
8. Re-attach the Bowden Tube: Depending on the design, the coupler may be built into the extruder housing or may be a separate piece that is screwed in. In either case, push the PTFE inward until it won't move, and cannot be tugged back out[5][6].
9. Testing: Reconnect the wiring and power on the printer. Load filament and run a test print to ensure everything is functioning correctly[7].
10. Calibration: Calibrate the extruder by updating the printer's firmware settings to accommodate the new extruder specifications[2][7].

Filament Compatibility
One of the significant advantages of an "upgraded aluminum extruder V2 with steel feeder gear" is its ability to handle a wider range of filaments[1][7]. While the stock plastic extruder may struggle with flexible or abrasive filaments, the metal extruder provides the necessary grip and durability to print these materials successfully.
Table: A comparison of filament compatibility between stock plastic extruders and upgraded aluminum extruders.
| Filament Type | Stock Plastic Extruder | Upgraded Aluminum Extruder |
| PLA | Excellent | Excellent |
| ABS | Good | Excellent |
| PETG | Good | Excellent |
| TPU (Flexible) | Poor | Good |
| Carbon Fiber Infused | Poor | Good |
| Nylon | Fair | Good |
Direct Drive vs. Bowden
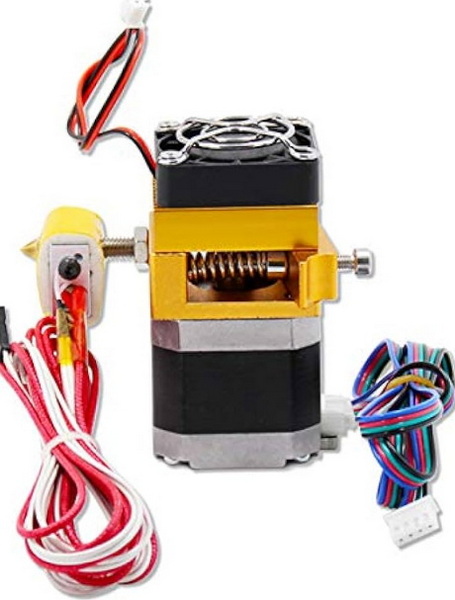
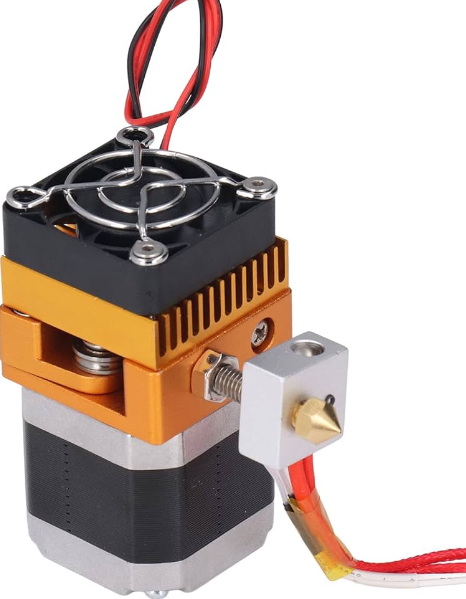
The "upgraded aluminum extruder V2 with steel feeder gear" can be used in both Bowden and direct drive configurations. Bowden setups are common in printers like the Ender 3 V2, where the extruder motor is mounted on the frame, and filament is fed through a PTFE tube to the hot end. Direct drive setups, on the other hand, mount the extruder motor directly above the hot end, reducing the distance the filament needs to travel.
Direct drive offers several advantages, particularly when printing flexible filaments, as it reduces the risk of buckling or jamming[2]. Some "upgraded aluminum extruder V2" kits include the necessary hardware to convert to a direct drive system.
Calibrating Your Extruder
After installing the upgraded aluminum extruder V2 with steel feeder gear, it's crucial to calibrate your extruder to ensure accurate filament extrusion. This involves adjusting the E-steps (steps per millimeter) value in your printer's firmware[2][7][10].
Here's how to calibrate your extruder:
1. Mark Filament: Measure and mark 120mm of filament from the extruder entrance[10].
2. Extrude Filament: Command the printer to extrude 100mm of filament[10].
3. Measure Remaining Filament: After extrusion, measure the remaining length of the marked filament.
4. Calculate New E-steps: Use the following formula to calculate the new E-steps value:
New E steps=Old E steps×(100mm/Actual Extrusion Length)
Where Actual Extrusion Length = 120mm - Remaining Length
5. Update Firmware: Update the E-steps value in your printer's firmware.
Real-World Examples and Case Studies
Many users have reported significant improvements in print quality after upgrading to an upgraded aluminum extruder V2 with steel feeder gear. For example, one user reported that upgrading to a dual-gear metal extruder eliminated clicking and filament slippage, resulting in smoother and more consistent prints[5][10]. Another user noted that the metal extruder handled flexible filaments much better than the stock plastic extruder, allowing them to print more complex and functional parts[1][7].
Cost Analysis
The cost of an upgraded aluminum extruder V2 with steel feeder gear typically ranges from \$20 to \$50, depending on the brand and features[2][9]. While this may seem like an additional expense, it's important to consider the long-term benefits. The increased durability and improved print quality can save you money on filament and replacement parts in the long run[1][7].
Potential Drawbacks
While the upgraded aluminum extruder V2 with steel feeder gear offers numerous advantages, there are a few potential drawbacks to consider:
- Cost: Upgrading requires an initial investment, which may be a barrier for some users[9].
- Complexity: While installation is generally straightforward, it may require some technical knowledge[5][6].
- Compatibility Issues: Ensure the upgraded extruder is fully compatible with your 3D printer model to avoid any issues[8].
Conclusion
In conclusion, the upgraded aluminum extruder V2 with steel feeder gear is a worthwhile investment for anyone looking to improve the print quality and reliability of their 3D printer. Its enhanced durability, consistent filament feeding, and compatibility with a wider range of filaments make it a valuable upgrade for both beginners and experienced users. While there are a few potential drawbacks to consider, the long-term benefits far outweigh the costs. By following the installation and calibration steps outlined in this guide, you can unlock the full potential of your 3D printer and achieve stunning print results.

FAQ
1. What are the main benefits of upgrading to an aluminum extruder?
Aluminum extruders offer increased durability, more consistent filament feeding, and improved print quality compared to stock plastic extruders[7]. The all-metal extruder is more durable and precise than the plastic one, leading to improved performance and longevity, as well as more consistent filament feeding, resulting in better print quality[1].
2. Is the upgraded aluminum extruder V2 compatible with all 3D printers?
The compatibility depends on the 3D printer model. Most kits are designed for popular models like the Ender 3 V2 and CR-10 series[8][13]. Always check the product description to ensure compatibility before purchasing.
3. Do I need to calibrate my extruder after upgrading?
Yes, calibrating your extruder is essential to ensure accurate filament extrusion and optimal print quality[7][10]. This involves adjusting the E-steps value in your printer's firmware.
4. Can the upgraded aluminum extruder handle flexible filaments like TPU?
Yes, aluminum extruders, especially those with dual gear systems, can handle flexible filaments much better than stock plastic extruders[13]. Upgrading to a metal extruder allows for experimentation with a broader range of filament types[7].
5. Is it difficult to install the upgraded aluminum extruder?
No, the installation process is generally straightforward and can be completed in under an hour. Most kits come with clear instructions and all necessary hardware[5][6].
Citations:
[1] https://store.creality.com/blog/ender-3-v2-upgrades
[2] https://www.reddit.com/r/3Dprinting/comments/q0xjka/is_it_worth_upgrading_to_an_all_metal_extruder/
[3] https://macewen3d.com/products/upgraded-stainless-steel-extruder-gear
[4] https://www.youtube.com/watch?v=UtemZqFJ5rY
[5] https://www.youtube.com/watch?v=3L3nPJZo04E
[6] https://www.crealityexperts.com/creality-extruder-upgrade-instructions
[7] https://blog.goldsupplier.com/metal-extruder/
[8] https://www.3dprintergear.com.au/creality-all-metal-dual-gear-extruder-upgrade-kit
[9] https://www.reddit.com/r/ender3v2/comments/149wfud/metal_extruder_upgrade/
[10] https://www.youtube.com/watch?v=VrqZgU8G3rQ
[11] https://letsprint3d.net/how-to-upgrade-the-extruder-ender-3/
[12] https://www.obico.io/blog/ender-3-v2/
[13] https://winsinn.com/ender-3-v2-upgrades/
[14] https://www.youtube.com/watch?v=ikVFselJO4Y
[15] https://letsprint3d.net/how-to-upgrade-the-extruder-ender-3/
[16] https://www.yjing-extrusion.com/can-you-use-an-aluminum-extruder-on-ender-3.html
[17] https://www.3djake.com/creality-3d-printers-spare-parts/metal-extruder-upgrade-kit
[18] https://www.youtube.com/watch?v=ikVFselJO4Y
[19] https://www.reddit.com/r/3Dprinting/comments/lbtobl/what_is_the_benefit_of_a_metal_extruder_for_an/
[20] https://www.aliexpress.com/i/1005006849813208.html
[21] https://www.yjing-extrusion.com/what-is-a-creality-aluminum-extruder-and-why-should-you-use-it.html
[22] https://www.3dea.co.nz/shop/product/creality-red-metal-extruder-upgrade-kit/
[23] https://www.crealityexperts.com/creality-extruder-guide
[24] https://rees52.com/products/upgrade-ender-3-extruder-kit-ender-3-v2-upgrades-metal-extruder-aluminum-mk8-bowden-extruder-40-teeth-drive-gear-for-ender-3-pro-ender-5-pro-ender-5-plus-cr-10-series-3d-printer-rs6177
[25] https://letsprint3d.net/upgrade-extruder-gear/
[26] https://kobee.com.au/blogs/3d-printing/how-to-upgrade-the-extruder-on-a-creality-ender-3-or-cr-10-printer
[27] https://www.aliexpress.com/item/1005007309443291.html
[28] https://support.th3dstudio.com/helpcenter/upgraded-aluminum-extruder-installation-video-v2/
[29] https://www.youtube.com/watch?v=aKDym_qGLEw
[30] https://www.youtube.com/watch?v=BUFC9YDIiLg
[31] https://www.reddit.com/r/ender3v2/comments/v6mmkl/getting_ready_to_add_an_all_metal_extruder/
[32] https://www.walmart.ca/en/ip/Upgrade-Ender-3-Extruder-V2-Upgrades-Metal-Extruder-Aluminum-MK8-Bowden-40-Teeth-Drive-Gear-Pro-Ender-5-Plus-CR-10-Series-3D-Printer/PRD3VPEC1F99PG1
[33] https://www.facebook.com/cytrontech/videos/upgrade-aluminum-extruder-for-ender-3-v2/809669046552050/?locale=ar_AR
[34] https://www.pinterest.com/pin/807973989443590199/
[35] https://www.tiktok.com/@theedgeoftech/video/7188190360349199658
[36] https://www.youtube.com/watch?v=Z5JmfNRNmtU
[37] https://www.youtube.com/watch?v=gGLZzTdMR5k
[38] https://www.3djake.com/questions-answers/creality-3d-printers-spare-parts/metal-extruder-upgrade-kit
[39] https://www.aliexpress.com/item/1005006099882524.html
[40] https://www.youtube.com/watch?v=uyFGLYJZfrM
[41] https://yarkspirifantasyart.com/6449-2/
[42] https://www.crealityexperts.com/creality-extruder-upgrade-instructions
[43] https://www.reddit.com/r/3Dprinting/comments/q0xjka/is_it_worth_upgrading_to_an_all_metal_extruder/
[44] https://winsinn.com/ender-3-v2-upgrades/
[45] https://community.ultimaker.com/topic/32275-ultimaker-2-extruder-problems-needed-upgrade/
[46] https://www.youtube.com/watch?v=pVFlGRmqNxI
[47] https://www.youtube.com/watch?v=UtemZqFJ5rY


