Content Menu
● Introduction to the Ender 3 Extruder System
>> Stock Plastic Extruder Limitations
● Benefits of Upgrading to an Aluminum Extruder
● Installation Process
● Factors to Consider When Upgrading
● Community Insights and Reviews
● Maintaining Your Aluminum Extruder
● Conclusion
● FAQ
>> 1. Will Upgrading to an Aluminum Extruder Void My Warranty?
>> 2. How Often Should I Maintain My Aluminum Extruder?
>> 3. Can an Aluminum Extruder Improve Printing with Flexible Filaments?
>> 4. Is the Aluminum Extruder Upgrade Compatible with All Ender 3 Models?
>> 5. What Are the Signs That My Extruder Needs to Be Replaced?
● Citations:
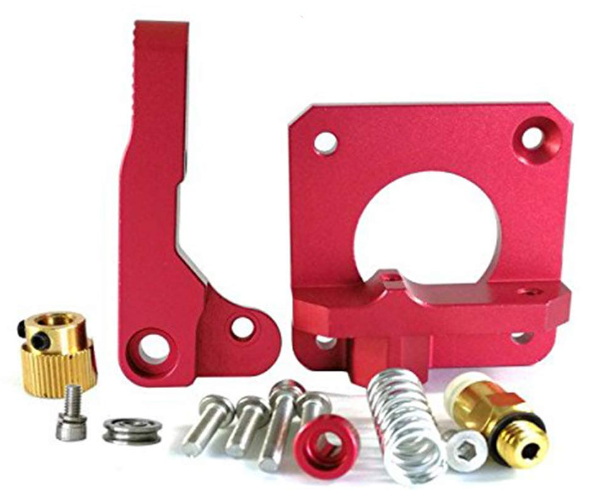
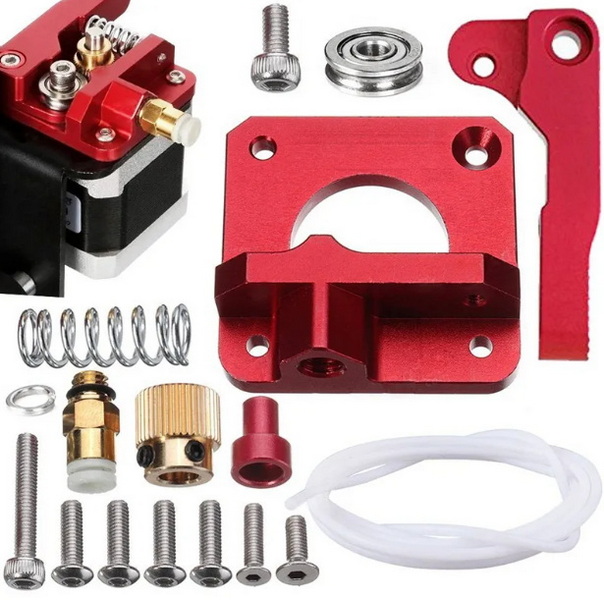
The Creality Ender 3 is a highly popular and versatile 3D printer, known for its affordability and ease of modification. One of the most impactful upgrades for this printer is replacing the stock plastic extruder with an Ender 3 aluminum extruder assembly. This upgrade can significantly enhance print quality, consistency, and the overall lifespan of the printer. In this article, we will delve into the benefits of using an aluminum extruder, the installation process, and factors to consider when making this upgrade.

Introduction to the Ender 3 Extruder System
The Ender 3 features a Bowden-style extrusion system, where filament is fed through a PTFE tube from a remote stepper motor located at the rear of the printer frame down to the hotend assembly at the print head. This design minimizes weight at the print head but can introduce challenges such as increased friction along longer PTFE tubes or potential misalignment during movement.
Stock Plastic Extruder Limitations
The stock plastic extruder found on the Ender 3 is functional but comes with several limitations:
- Durability Issues: Plastic extruders are prone to wear and tear. The constant stress of filament feeding can cause the plastic to degrade over time, leading to cracks, deformation, and eventual failure.
- Inconsistent Filament Feeding: The flexibility of plastic can result in inconsistent filament feeding, leading to under-extrusion or over-extrusion, affecting the dimensional accuracy and surface finish of prints.
- Heat Sensitivity: Plastic is not an ideal material for dissipating heat. This can cause the filament to soften or melt prematurely, leading to clogs and print imperfections.
Benefits of Upgrading to an Aluminum Extruder
Upgrading to an Ender 3 aluminum extruder assembly offers several advantages that address the limitations of the stock plastic extruder:
- Increased Durability: Aluminum is much more resistant to wear and tear than plastic. An aluminum extruder can withstand the constant stress of filament feeding without degrading, ensuring long-term reliability.
- Improved Consistency: The rigid metal construction of an aluminum extruder ensures more consistent filament feeding. This results in more accurate and uniform extrusion, leading to better print quality with fewer imperfections.
- Better Heat Dissipation: Aluminum conducts heat more efficiently than plastic. This helps dissipate heat away from the motor and filament, reducing the risk of heat-related issues such as softening or clogging.
- Longer Lifespan: An aluminum extruder is likely to last much longer than its plastic counterpart. Its robust construction and resistance to wear make it a worthwhile investment for users who print frequently or require high levels of reliability.
Installation Process
Upgrading to an Ender 3 aluminum extruder assembly is a relatively straightforward process that requires basic technical skills. Here's a step-by-step guide:
1. Prepare Your Printer: Turn off and unplug your Ender 3. Allow the hotend to cool completely.
2. Gather Necessary Tools: You will need Allen wrenches (1.5mm, 2mm, and 2.5mm), a screwdriver, and pliers.
3. Unload Filament: Remove any filament from the extruder by heating up the hotend and pulling it out gently.
4. Disassemble the Stock Extruder:
- Unscrew the coupling holding the Bowden tube in place.
- Disconnect the stepper motor from the extruder body.
- Detach the lever arm from the old extruder assembly.
5. Install the Aluminum Extruder:
- Attach the new aluminum base plate to the stepper motor.
- Install the new gear onto the motor shaft, ensuring proper alignment.
- Assemble the lever arm and idler pulley.
6. Reconnect Components:
- Reattach the Bowden tube to its new coupling.
- Reconnect any electrical connectors.
7. Calibrate E-Steps: After installation, recalibrate your extruder steps per millimeter (E-steps) for accurate extrusion.
8. Test Print: Run a test print to ensure everything is functioning correctly.

Factors to Consider When Upgrading
While upgrading to an Ender 3 aluminum extruder assembly is generally beneficial, there are several factors to consider:
- Compatibility: Ensure the aluminum extruder you choose is specifically compatible with the Ender 3 model. Some extruders are designed for specific versions or have slight variations that may affect compatibility.
- Installation Complexity: While the installation process is relatively simple, it requires some basic technical skills. If you're not comfortable with disassembling and reassembling printer components, consider seeking assistance from someone with experience.
- Cost: Aluminum extruders are more expensive than plastic ones. However, the investment is often worthwhile due to the improved performance and longevity.
- Maintenance: While more durable, aluminum extruders still require regular maintenance for optimal performance. This includes cleaning the extruder gear and ensuring proper tension on the lever arm.
- Warranty: Modifying your printer may affect its warranty. Check with the seller or manufacturer about their specific warranty policies regarding upgrades.
Community Insights and Reviews
Many users in the 3D printing community have shared their experiences with upgrading to an Ender 3 aluminum extruder assembly. Most reviews highlight improvements in print quality, reliability, and durability. Users often report more consistent extrusion, reduced stringing and oozing, and better overall print finish.
Maintaining Your Aluminum Extruder
To ensure the longevity and performance of your Ender 3 aluminum extruder assembly, regular maintenance is essential:
- Regular Cleaning: Clean the extruder gear regularly to remove any accumulated debris or filament residue.
- Check Tension: Ensure the tension on the extruder arm is properly adjusted. Too little tension can cause slipping, while too much tension can damage the filament.
- Inspect for Wear: Periodically inspect the extruder for any signs of wear or damage. Replace any worn parts promptly to maintain optimal performance.
- Lubricate Moving Parts: Apply a small amount of lubricant to the moving parts of the extruder to keep them running smoothly.
Conclusion
Upgrading to an Ender 3 aluminum extruder assembly is a worthwhile investment for improving print quality, consistency, and the overall lifespan of your 3D printer. While the stock plastic extruder is functional, it has limitations that can affect performance over time. An aluminum extruder offers increased durability, better filament feeding, and improved heat dissipation, making it a popular and effective upgrade. By following the step-by-step installation guide and considering the factors discussed in this article, you can successfully upgrade your Ender 3 and enjoy enhanced 3D printing capabilities.

FAQ
1. Will Upgrading to an Aluminum Extruder Void My Warranty?
Upgrading your printer may affect its warranty. It's best to check with the seller or manufacturer about their specific warranty policies regarding upgrades.
2. How Often Should I Maintain My Aluminum Extruder?
Regular maintenance, including cleaning and inspection, should be performed every 1-3 months, depending on usage. More frequent maintenance may be required if you print frequently or use abrasive filaments.
3. Can an Aluminum Extruder Improve Printing with Flexible Filaments?
Yes, an aluminum extruder can improve printing with flexible filaments by providing more consistent and reliable filament feeding. However, for optimal results, consider using a dual-gear or direct drive extruder specifically designed for flexible filaments.
4. Is the Aluminum Extruder Upgrade Compatible with All Ender 3 Models?
Most aluminum extruder upgrades are compatible with various Creality models, including the Ender 3, Ender 3 Pro, and Ender 3 V2. However, always check the compatibility before purchasing.
5. What Are the Signs That My Extruder Needs to Be Replaced?
Common signs include inconsistent extrusion, clicking sounds from the stepper motor, and visible wear on plastic parts. These issues often indicate that your extruder is failing and may need to be replaced.
Citations:
[1] https://www.yjing-extrusion.com/is-the-ender-3-pro-aluminum-extruder-worth-the-upgrade.html
[2] https://www.yjing-extrusion.com/is-the-upgraded-aluminum-extruder-v2-worth-the-investment-for-better-print-quality.html
[3] https://www.yjing-extrusion.com/how-to-upgrade-to-an-ender-3-aluminum-extruder.html
[4] https://www.youtube.com/watch?v=fT91Oj2RUDk
[5] https://www.yjing-extrusion.com/what-are-the-steps-to-install-an-aluminum-extruder-on-your-ender-3.html
[6] https://www.yjing-extrusion.com/can-the-ender-3-v2-aluminum-extruder-solve-jamming-issues.html
[7] https://www.yjing-extrusion.com/can-you-use-an-aluminum-extruder-on-ender-3.html
[8] https://www.wevolver.com/article/ender-3-extruder-skipping
[9] https://www.youtube.com/watch?v=paRjgVkq46w
[10] https://www.reddit.com/r/3Dprinting/comments/lbtobl/what_is_the_benefit_of_a_metal_extruder_for_an/
[11] https://www.youtube.com/watch?v=m6dRh0oVzhc
[12] https://www.eevblog.com/forum/3d-printing/ender3-v2-metal-extruder/
[13] https://www.youtube.com/watch?v=UtemZqFJ5rY
[14] https://letsprint3d.net/best-extruder-upgrades-creality-ender-3/
[15] https://blog.goldsupplier.com/metal-extruder/
[16] https://www.creality.com/br/blog/simple-creality-ender-3-s1-review-worth-buying-or-not
[17] https://letsprint3d.net/how-to-upgrade-the-extruder-ender-3/
[18] https://www.reddit.com/r/ender3/comments/eqeddp/the_all_aluminum_extruder_upgrade_is_only_ten/
[19] https://www.youtube.com/watch?v=k6eDBkc1mDg
[20] https://www.reddit.com/r/ender3v2/comments/v6mmkl/getting_ready_to_add_an_all_metal_extruder/
[21] https://www.youtube.com/watch?v=pVFlGRmqNxI
[22] https://www.homebuiltworkshop.com/2022/02/19/installing-an-all-metal-extruder-on-my-creality-ender-3-v2/
[23] https://www.aliexpress.com/item/1005006523519131.html
[24] https://support.th3dstudio.com/helpcenter/upgraded-aluminum-extruder-installation-video-v2/
[25] https://www.youtube.com/watch?v=rzNmFK2zIWo
[26] https://www.youtube.com/watch?v=rhlIFp0_w2I
[27] https://www.youtube.com/watch?v=RLsALMPDb84
[28] https://www.reddit.com/r/ender3v2/comments/wjxsaj/problems_after_installing_metal_extruder/
[29] https://www.thingiverse.com/groups/ender3/forums/general/topic:41359
[30] https://forum.creality.com/t/extruder-gear-slipping-sometimes/13948
[31] https://www.crealitycloud.com/blog/3d-printing-troubleshooting/ender-3-extruder-skipping
[32] https://www.youtube.com/watch?v=fI2l2LSkEME
[33] https://forum.creality.com/t/ender-3-v1-extruder-assembly-broke-replaced-with-metal-has-problems-feeding-filament/18457
[34] https://3dprintmentor.com/creality-ender-3-v3-se-review/
[35] https://www.reddit.com/r/3Dprinting/comments/q0xjka/is_it_worth_upgrading_to_an_all_metal_extruder/
[36] https://www.youtube.com/watch?v=VrqZgU8G3rQ
[37] https://www.youtube.com/watch?v=zJRxRVN3p3Y
[38] https://www.youtube.com/watch?v=ikVFselJO4Y
[39] https://www.youtube.com/watch?v=uMHtzwEHfUc
[40] https://www.youtube.com/watch?v=OgI-rJljayY
[41] https://www.crealityexperts.com/creality-extruder-upgrade-instructions
[42] https://wol3d.com/product/ender-3-extruder-assembly/
[43] https://3dprinting.stackexchange.com/questions/20664/replacing-and-identification-of-a-broken-piece-of-the-extruder
[44] https://images-na.ssl-images-amazon.com/images/I/A1RtrhQ8ZOL.pdf
[45] https://letsprint3d.net/how-to-assemble-creality-ender-3/


