Content Menu
● Why Upgrade to an Aluminum Extruder?
● Limitations of the Stock Plastic Extruder
● Benefits of Upgrading to an Aluminum Extruder
● Tools Required
● Step-by-Step Guide to Upgrade Your Ender 3 Extruder
>> 1. Preparing Your Printer
>> 2. Remove the Old Extruder
>> 3. Assemble the New Aluminum Extruder
>> 4. Reattach Components
>> 5. Testing Your Upgrade
● Factors to Consider When Upgrading
● Maintaining Your Aluminum Extruder
● Community Insights and Reviews
● Conclusion
● FAQs
>> 1. What are the benefits of upgrading to an aluminum extruder?
>> 2. How long does it take to upgrade my Ender 3's extruder?
>> 3. Do I need special tools for this upgrade?
>> 4. Will I need to recalibrate my printer after upgrading?
>> 5. Can I use flexible filaments with an aluminum extruder?
● Citations:
Upgrading your Ender 3 to an aluminum extruder is a significant step towards enhancing your 3D printing experience. The stock plastic extruder is often prone to wear and tear, leading to inconsistent filament feeding and print quality. In this comprehensive guide, we will walk you through the process of upgrading to an aluminum extruder, including necessary tools, step-by-step instructions, and tips for optimal performance.

Why Upgrade to an Aluminum Extruder?
- Durability: Aluminum extruders are much more robust than their plastic counterparts, reducing the risk of breakage over time.
- Consistent Filament Feeding: They provide better grip on the filament, ensuring a steady flow and reducing the chances of skipping or jamming.
- Improved Print Quality: With a reliable extruder, you can expect better print consistency and quality.
- Flexibility with Filaments: Aluminum extruders can handle a wider range of filament types, including flexible materials.
Limitations of the Stock Plastic Extruder
The stock plastic extruder on the Ender 3 has several limitations that can hinder your printing experience:
- Fragility: The plastic components can crack or break under stress, especially during filament loading or unloading.
- Inconsistent Pressure: The single gear design may not apply uniform pressure on the filament, leading to slippage and inconsistent extrusion.
- Limited Compatibility: The stock extruder may struggle with certain filament types, particularly flexible or high-temperature materials.
Benefits of Upgrading to an Aluminum Extruder
Upgrading to an aluminum extruder offers numerous advantages:
- Enhanced Performance: Aluminum extruders provide better torque and grip on the filament, resulting in smoother extrusion and improved print quality.
- Longer Lifespan: The durability of aluminum components means they are less likely to wear out or break compared to plastic parts.
- Better Heat Management: Aluminum dissipates heat more effectively than plastic, reducing the risk of heat-related issues during printing.
Tools Required
Before starting the upgrade process, gather the following tools:
- Allen wrenches (typically 1.5mm, 2mm, and 2.5mm)
- Screwdriver
- Pliers (optional)
- A new aluminum extruder kit

Step-by-Step Guide to Upgrade Your Ender 3 Extruder
1. Preparing Your Printer
- Turn Off the Printer: Ensure your Ender 3 is powered off.
- Unload Filament: Remove any filament from the extruder by heating up the hotend and pulling it out gently.
2. Remove the Old Extruder
- Unscrew the Coupling: Use a 2mm Allen wrench to unscrew the coupling holding the Bowden tube in place.
- Disconnect the Stepper Motor: Remove the screws attaching the stepper motor to the extruder body. Hold the motor while unscrewing to prevent it from falling.
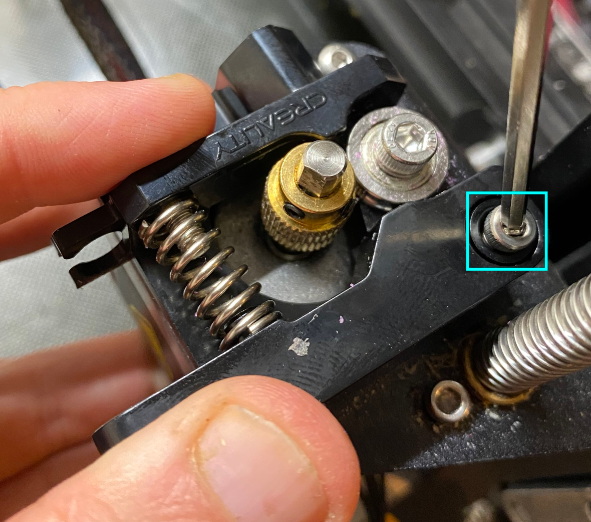
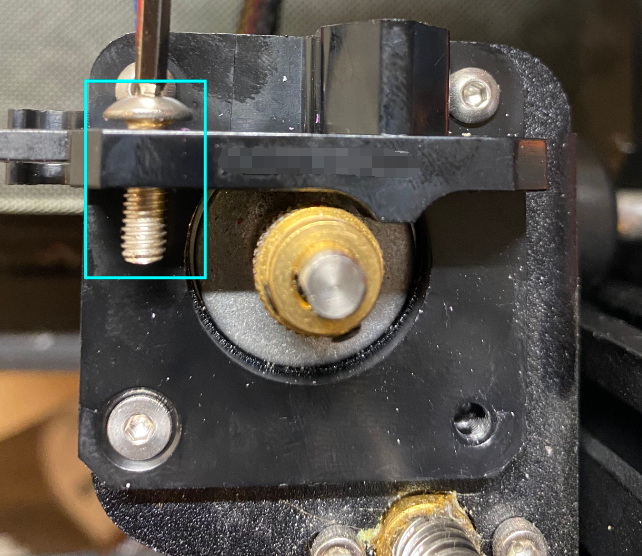
- Detach the Lever Arm: Unscrew and remove the lever arm from the old extruder assembly.
3. Assemble the New Aluminum Extruder
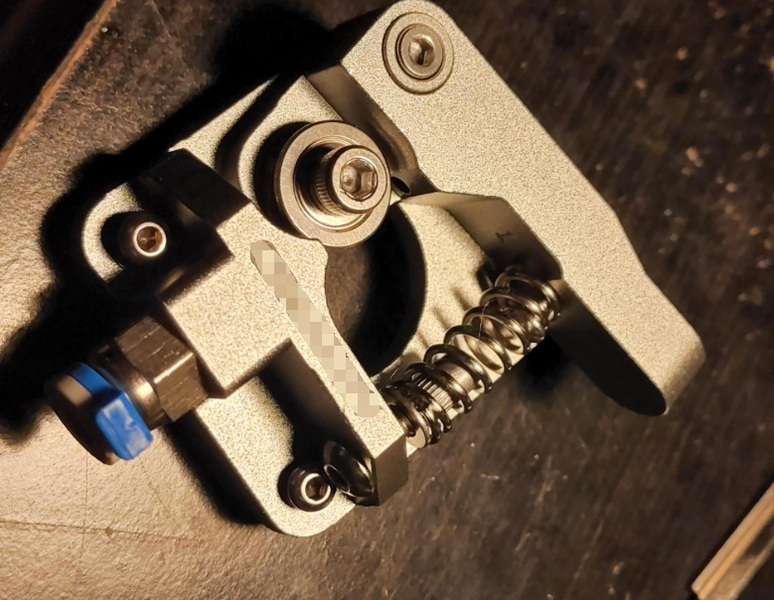
- Attach the Base Plate: Place the new aluminum base plate onto the motor. Secure it using screws provided in your kit.
- Install Gear: Slide on the new gear and ensure one of its grub screws aligns with the flat part of the motor shaft for a secure fit.
- Assemble Lever Arm: Attach the lever arm and idler pulley using screws, ensuring that it can pivot freely.
4. Reattach Components
- Reconnect Bowden Tube: Insert and secure the Bowden tube into its new coupling on the aluminum extruder.
- Reconnect Wiring: Plug back in any electrical connectors that were disconnected during disassembly.
5. Testing Your Upgrade
- Power On Your Printer: Turn on your Ender 3 and perform a test print to ensure everything is functioning correctly.
- Calibrate E-Steps: After changing your extruder, it's crucial to recalibrate your e-steps for accurate filament extrusion.
Factors to Consider When Upgrading
When considering an upgrade to an aluminum extruder for your Ender 3, keep these factors in mind:
- Compatibility: Ensure that your chosen aluminum extruder is compatible with your specific model of Ender 3 (e.g., Pro or V2).
- Type of Filament Used: If you plan on using flexible filaments frequently, consider a dual gear or direct drive system for optimal performance.
- Installation Difficulty: Some kits may require more technical skill than others; choose one that matches your comfort level with DIY projects.
Maintaining Your Aluminum Extruder
After upgrading, regular maintenance will help ensure optimal performance:
1. Regular Cleaning: Periodically clean the extruder gear to remove any accumulated debris or filament residue. Use a brush or compressed air to dislodge any particles.
2. Check Tension: Ensure that tension on the extruder arm is properly adjusted. Too little tension can cause filament slippage, while too much tension can deform it.
3. Inspect for Wear: Regularly inspect for signs of wear or damage; replace any worn parts promptly to prevent further issues.
4. Lubricate Moving Parts: Apply a small amount of lubricant designed for 3D printer components to keep moving parts running smoothly.
Community Insights and Reviews
Many users in the 3D printing community have shared their experiences with aluminum extruder upgrades on the Ender 3:
- Positive Feedback: Most users report noticeable improvements in print quality and reliability after upgrading to an aluminum extruder.
- Installation Tips: Users recommend watching video tutorials and reading online guides before attempting installation for better understanding and fewer mistakes.
- Calibration Advice: Many emphasize recalibrating printer settings after installation for optimized performance post-upgrade.
Conclusion
Upgrading to an aluminum extruder on your Ender 3 is a straightforward process that yields significant benefits in terms of durability and print quality. By following this guide, you can enhance your printing experience and reduce potential issues related to filament feeding. The investment in an aluminum extruder not only improves immediate performance but also contributes to longer-term reliability for all your future projects.

FAQs
1. What are the benefits of upgrading to an aluminum extruder?
Upgrading provides increased durability, consistent filament feeding, improved print quality, and flexibility with different filament types.
2. How long does it take to upgrade my Ender 3's extruder?
The upgrade process typically takes about 30 minutes to an hour, depending on your familiarity with disassembling printer components.
3. Do I need special tools for this upgrade?
You will need basic tools such as Allen wrenches and a screwdriver; these are commonly included with most printer kits.
4. Will I need to recalibrate my printer after upgrading?
Yes, recalibrating your e-steps is essential after replacing any components related to filament feeding for accurate prints.
5. Can I use flexible filaments with an aluminum extruder?
Yes, aluminum extruders are better suited for handling flexible filaments compared to plastic ones due to their robust design.
Citations:
[1] https://www.yjing-extrusion.com/can-you-use-an-aluminum-extruder-on-ender-3.html
[2] https://forum.creality.com/t/ender-3-v1-extruder-assembly-broke-replaced-with-metal-has-problems-feeding-filament/18457
[3] https://www.reddit.com/r/ender3v2/comments/qaojqf/maintenance_schedule_or_life_expectancy_of_parts/
[4] https://winsinn.com/ender-3-v2-upgrades/
[5] https://images-na.ssl-images-amazon.com/images/I/A1RtrhQ8ZOL.pdf
[6] https://www.crealityexperts.com/creality-extruder-upgrade-instructions
[7] https://forum.creality.com/t/extruder-gear-slipping-sometimes/13948
[8] https://www.youtube.com/watch?v=OvAU1ZLFyow
[9] https://www.3dea.co.nz/shop/product/creality-red-metal-dual-gear-extruder-upgrade-kit/
[10] https://www.instructables.com/How-to-Setup-Creality-Ender-3-3d-Printer/
[11] https://www.reddit.com/r/ender3v2/comments/149wfud/metal_extruder_upgrade/
[12] https://www.reddit.com/r/ender3v2/comments/wjxsaj/problems_after_installing_metal_extruder/
[13] https://www.youtube.com/watch?v=7P-3qH2Sx6I
[14] https://www.reddit.com/r/ender3/comments/ebl2m0/all_metal_extruder_needed/
[15] https://www.youtube.com/watch?v=OgI-rJljayY
[16] https://www.youtube.com/watch?v=ikVFselJO4Y
[17] https://all3dp.com/2/ender-3-extruder-skipping-troubleshooting/
[18] https://www.youtube.com/watch?v=m6dRh0oVzhc
[19] https://www.aliexpress.com/item/1005006849813208.html
[20] https://www.youtube.com/watch?v=pVFlGRmqNxI


