Content Menu
● Introduction to MK8 Extruders
>> Advantages of MK8 Extruders
● Preparation for Installation
>> Tools Required
● Step-by-Step Installation Guide
>> Step 1: Remove the Old Extruder
>> Step 2: Assemble the New Extruder
>> Step 3: Mount the New Extruder
>> Step 4: Reconnect the Bowden Tube
>> Step 5: Reconnect Wiring
>> Step 6: Calibrate E-Steps
>> Step 7: Test Print
● Conclusion
● FAQs
>> 1. What types of filaments can an MK8 Extruder handle?
>> 2. Is a direct drive extruder necessary for printing flexible filaments?
>> 3. How do I install an MK8 Extruder on my 3D printer?
>> 4. Can I use an MK8 Extruder in a dual-extrusion setup?
>> 5. What maintenance is required for an MK8 Extruder?
● Citations:
Installing an MK8 Extruder Aluminum Drive Feed on your 3D printer can significantly enhance its performance, especially when handling flexible filaments. This guide will walk you through the process step by step, providing detailed instructions and visual aids to ensure a smooth installation.

Introduction to MK8 Extruders
The MK8 Extruder Aluminum Drive Feed is a popular upgrade among 3D printing enthusiasts due to its robust construction and improved performance compared to traditional plastic extruders. It is designed to handle 1.75mm filament and is widely compatible with many popular 3D printer models, including those from Creality, Anycubic, and more.
Advantages of MK8 Extruders
1. Durability: Aluminum extruders are less prone to wear and tear compared to plastic ones, ensuring consistent performance over time.
2. Temperature Resistance: They can withstand higher temperatures without deforming, which is crucial for printing materials like ABS.
3. Filament Compatibility: Aluminum MK8 extruders can handle a wide range of filaments, including PLA, ABS, PETG, and flexible materials like TPU.
Preparation for Installation
Before starting the installation, ensure you have the following components:
- MK8 Extruder Aluminum Drive Feed Kit
- Allen wrenches and screwdrivers
- PTFE tube (if using a Bowden setup)
- Filament sensor (if applicable)
Tools Required
- Allen wrenches
- Screwdrivers
- Pliers (for handling small parts)

Step-by-Step Installation Guide
Step 1: Remove the Old Extruder
1. Disconnect Power: Ensure your printer is turned off and unplugged.
2. Remove Filament: Unload any filament from the printer.
3. Disconnect Bowden Tube: If using a Bowden setup, disconnect the tube from the extruder assembly.
4. Remove Screws: Take out the screws holding the old extruder in place. Support the stepper motor to prevent it from falling.
Step 2: Assemble the New Extruder
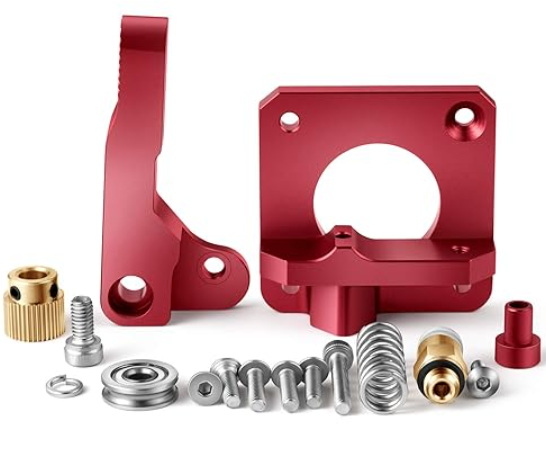
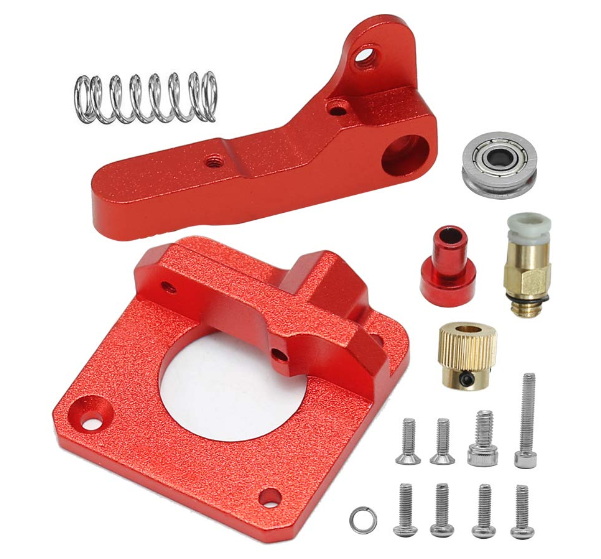
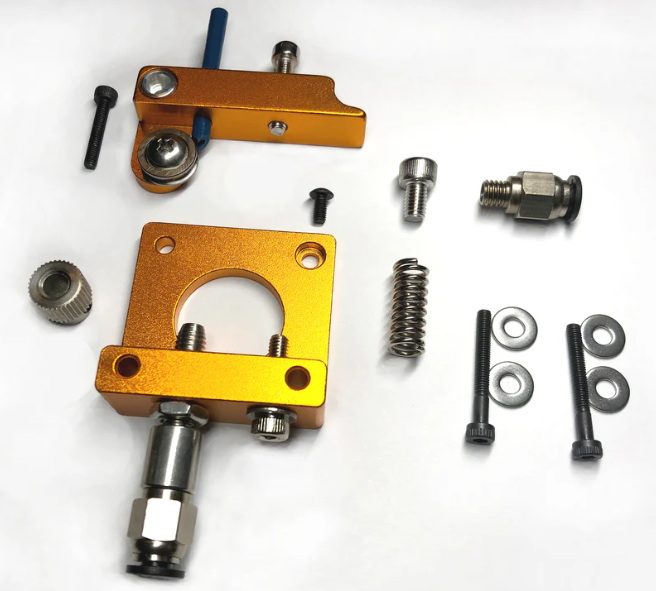
1. Attach Drive Gear: Secure the drive gear to the stepper motor shaft. Ensure one of the grub screws aligns with the flat side of the motor shaft.
2. Mount Base Plate: Place the aluminum base plate onto the stepper motor and secure it using provided screws.
3. Attach Lever Arm: Connect the lever arm to the base plate. Insert a spring into position to provide tension for filament feeding.
4. Install Pulley and Tensioner: Attach the pulley wheel onto the lever arm using a lock washer and bolt. Adjust tension by compressing the spring slightly while securing it in place.
Step 3: Mount the New Extruder
1. Position the Extruder: Align the new extruder with the mounting points on your printer.
2. Secure with Screws: Use the provided screws to secure the extruder firmly in place.
Step 4: Reconnect the Bowden Tube
1. Insert PTFE Tube: Push the PTFE tube back into its coupler on the new aluminum extruder.
2. Secure with Clips: Ensure it is pushed in firmly and secured with any clips provided in your kit.
Step 5: Reconnect Wiring
1. Plug in Cables: Reconnect any wiring that was disconnected during removal.
2. Ensure Secure Connections: Make sure all connections are secure before powering on.
Step 6: Calibrate E-Steps
1. Power On Printer: Turn on your printer and navigate to your printer settings.
2. Load Filament: Feed filament into your new aluminum extruder and ensure it moves smoothly through the system.
3. Calibrate E-Steps: Recalibrate your E-steps to ensure accurate extrusion rates.
Step 7: Test Print
Run a Test Print: Perform a test print to check for any issues with extrusion or alignment.
Conclusion
Upgrading to an MK8 Extruder Aluminum Drive Feed can significantly enhance your 3D printing experience, especially when working with flexible filaments. By following these steps and ensuring proper assembly and calibration, you can achieve better print quality and durability.

FAQs
1. What types of filaments can an MK8 Extruder handle?
An MK8 Extruder Aluminum Drive Feed can handle a wide range of filaments, including PLA, ABS, PETG, and flexible materials like TPU.
2. Is a direct drive extruder necessary for printing flexible filaments?
While a direct drive extruder is highly recommended for flexible filaments due to its better control over retraction and filament path, a well-optimized Bowden setup can also work effectively.
3. How do I install an MK8 Extruder on my 3D printer?
Installation typically involves removing the old extruder, assembling the new one if necessary, and securing it to the printer's mount. Refer to the step-by-step guide above for detailed instructions.
4. Can I use an MK8 Extruder in a dual-extrusion setup?
Yes, you can use two different MK8 extruders in a dual-extrusion setup as long as they are compatible with your printer's configuration.
5. What maintenance is required for an MK8 Extruder?
Regular cleaning of the nozzle and feeding mechanism, checking tension settings, and applying lubricant to moving parts as needed are recommended for optimal performance.
Citations:
[1] https://www.youtube.com/watch?v=zJRxRVN3p3Y
[2] https://www.bdtronics.com/upgrade-mk8-extruder-aluminum-block-bowden-extruder-kit-1-75mm-filament-for-3d-printers.html
[3] https://auslese-robotics.com/product-detail/cr-10-extruder-upgraded-replacement-aluminum-mk8-drive-feed-3d-printer-
[4] https://www.yjing-extrusion.com/can-an-aluminum-mk8-extruder-with-direct-drive-handle-flexible-filaments.html
[5] https://www.yjing-extrusion.com/how-to-install-an-aluminum-extruder-on-ender-3-v2.html
[6] https://macewen3d.com/products/mk8-extruder-aluminum-drive-feed-for-cr-10-cr-10-s4-and-cr-10-s5
[7] https://www.youtube.com/watch?v=TPyTiZ6-_jM
[8] https://grobotronics.com/bowden-extruder-feed-kit-mk8-silver-1.75mm-aluminum.html?sl=en
[9] https://www.aliexpress.com/item/1005008055648520.html
[10] https://www.aliexpress.com/item/1005004923874649.html
[11] https://gr33nonline.wordpress.com/2019/05/15/assembly-of-an-mk8/
[12] https://www.youtube.com/watch?v=UtemZqFJ5rY
[13] https://www.youtube.com/watch?v=Npuocf_f0jk
[14] https://www.aliexpress.com/item/1005007782637654.html
[15] https://www.youtube.com/watch?v=hKqs-mR0urw
[16] https://www.pinterest.com/pin/pingl-sur-products--824158800582576492/
[17] https://3dprintingperth.com/products/extruder-set-aluminum-alloy-mk8-upgraded-drive-feeder
[18] https://www.aliexpress.com/item/1005001446695412.html
[19] https://www.dhgate.com/goods/979958607.html
[20] https://www.reddit.com/r/ender5plus/comments/n02dbn/reason_to_upgrade_to_an_all_metal_mk8_extruder/
[21] https://www.microcenter.com/product/625573/mk8-extruder-drive-feed?ob=1&rf=Search+Results&osfs=true&bvstate=pg%3A2%2Fct%3Ar&storeid=175
[22] https://www.reddit.com/r/CR6/comments/n4cmhd/upgraded_replacement_aluminum_mk8_extruder_drive/
[23] https://www.daraz.com.bd/products/upgraded-mk8-extruder-aluminum-drive-feed-replacement-3d-printer-extruders-kit-for-city-cr-10cr-10scr-10-s4reprap-prusa-i3175mm-bonus1-meter-ptfe-ptfe-tube-i215641697.html
[24] https://forum.makerforums.info/t/what-do-you-all-think-about-the-mk8-extruder/2638
[25] https://pizzaspotplymouth.com/?n=1108389821968
[26] https://www.youtube.com/watch?v=QnrH2Sk7y40
[27] https://letsprint3d.net/how-to-upgrade-the-extruder-ender-3/
[28] https://cs3d.com.au/products/rhs-pro-aluminum-extruder-upgrade-kit-mk8-drive-feed-3d-creality-ender-3-cr-10
[29] https://www.mmobiel.com/mk8-extruder-drive-feed-dual-gear-upgraded-replacement-kit-for-1.75-filament-12v
[30] https://www.daraz.com.bd/products/upgraded-mk8-extruder-aluminum-drivebonus1-meter-ptfe-ptfe-tube-i248962547.html
[31] https://www.kingly.sg/products/creality-upgraded-aluminum-mk8-extruder-drive-feed-for-cr-10-ender-3-ender-3-pro
[32] https://forum.v1e.com/t/mk8-extruder-issues/5113
[33] https://novo3d.in/dual-gear-extruder/
[34] https://reprap.org/forum/read.php?4%2C502553
[35] https://forum.v1e.com/t/problem-with-mk8-extruder/6793


